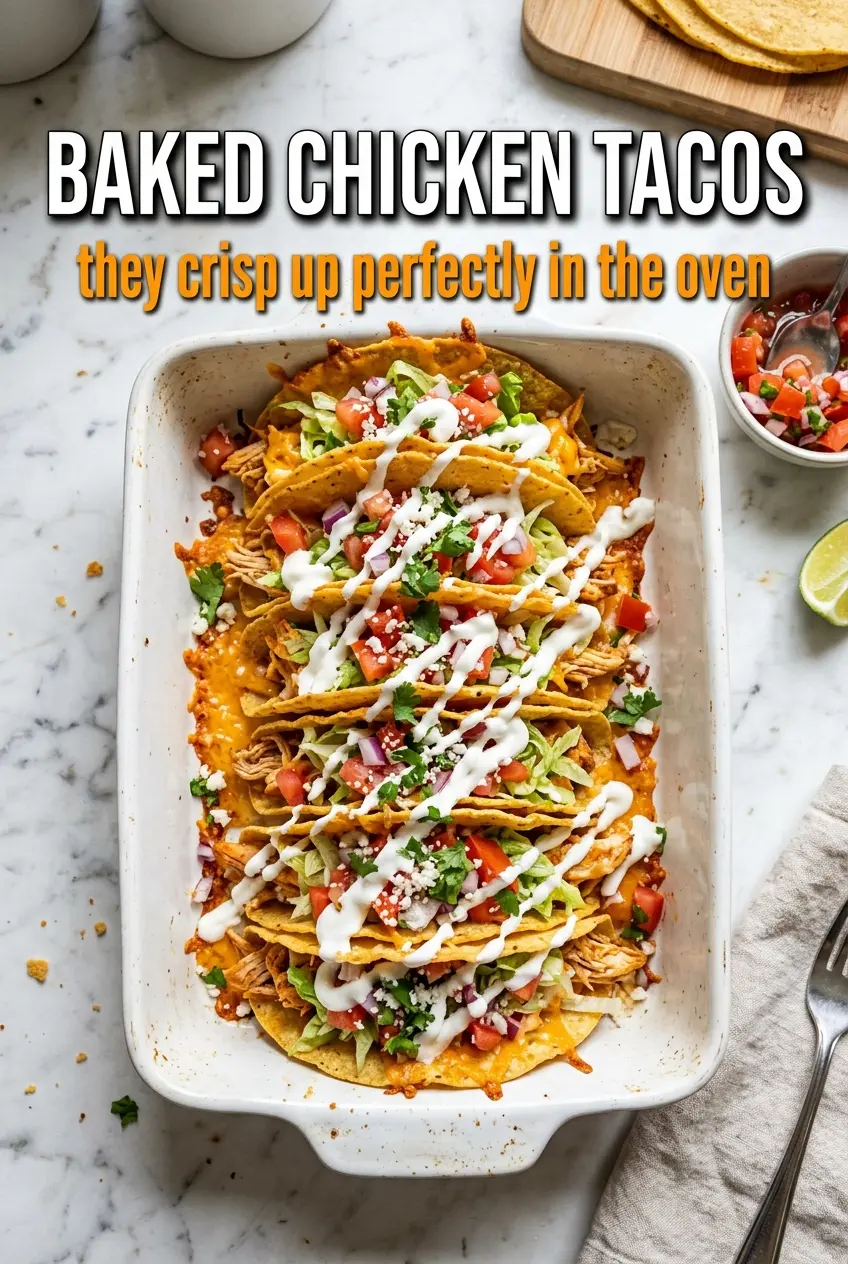
Crispy baked chicken tacos hit the table with the kind of crunch that disappears fast. The shells stay sturdy enough to hold the filling, the chicken stays juicy, and every bite gets a mix of warm seasoned meat, cool lettuce, melted cheese, and a squeeze of lime. They’ve got the same weeknight ease as a skillet taco, but the baked shell gives them a texture that feels a little more special without adding much work.
The trick is in the separate jobs each part does. The chicken gets seasoned before it ever goes into the pan, so the meat carries flavor all the way through instead of relying on toppings to do the heavy lifting. The tortillas crisp up in the oven on their own, which keeps them from going soft before dinner hits the table. Once you’ve made them this way, it’s hard to go back to flabby tacos.
Below, I’ve included the small details that keep the shells crisp and the chicken tender, plus a few smart swaps if you want to change up the fillings or make the tacos fit what’s already in your kitchen.
The chicken stayed juicy and the tortillas actually crisped up instead of folding over. I loved how the shells held together once filled, and the lime at the end made the whole thing taste fresh.
Crispy baked chicken tacos with fresh toppings are the kind of easy dinner that disappears fast, so pin this one for your next taco night.
The Shells Need More Heat Than You Think
Most baked taco shells fail for one reason: they dry out instead of crisping. Corn tortillas need enough oil spray and enough oven heat to turn brittle at the edges before they collapse in the center. If the tortillas still feel bendy when they come out, they’ll soften again the second the filling goes in, which is why the shells need to be fully crisp before you build them.
The other piece that matters is how you shape them. A taco shell that sits too flat won’t hold much filling, and one that’s folded too tightly can tear as it bakes. Use the sheet pan and a little support from foil or a rack setup if needed, then bake until the tortillas look dry and lightly blistered. That’s the point where they’ll stay crisp long enough to eat without chasing filling across the plate.
What the Chicken and Tortillas Are Each Doing Here
- Chicken breasts — Lean chicken gives you a clean, neutral base that takes taco seasoning well. Slice or shred it after cooking while it’s still warm so it stays juicy; if you wait too long, it dries out and gets stringy. Thighs work too, but they’ll give you a richer, softer filling.
- Taco seasoning — This does the flavor work fast, especially when it hits the chicken before cooking. Store-bought seasoning is fine here, but if yours is low-salt, add a little extra salt to the chicken so the flavor doesn’t disappear under the toppings.
- Corn tortillas — These crisp in the oven much better than flour tortillas, which tend to stay pliable instead of turning into proper shells. If you’re using smaller tortillas, plan on more tacos per person. Fresh tortillas are less likely to crack when you shape them.
- Olive oil and cooking spray — The olive oil helps the chicken cook up with a little color, while the spray gives the tortillas the light coating they need to crisp. Skipping the spray leaves you with dry, leathery shells instead of baked taco shells with a real crunch.
Building the Filling and Crisping the Shells at the Right Time
Season the chicken before it hits the skillet
Coat the chicken breasts with taco seasoning, salt, and pepper so the surface starts working right away. Heat the olive oil in a skillet over medium-high heat, then cook the chicken until it reaches 165°F in the thickest part and the outside has some color. If the pan is too hot, the seasoning can scorch before the inside is done; if it’s too cool, the chicken will steam instead of brown.
Shred while the meat is still warm
Move the cooked chicken to a board and shred it while it still gives easily to the fork. Warm chicken pulls apart into softer pieces, which makes the tacos easier to eat and less dry on the plate. If the meat seems a little firm, let it rest for a couple of minutes before shredding rather than forcing it while it’s ripping apart.
Bake the tortillas until they hold their shape
Form the corn tortillas into taco shells on a baking sheet sprayed with cooking oil, then bake at 375°F until they’re crisp and set. Watch the edges first; they’ll brown before the center looks completely rigid. Pull them when they’re dry and firm, not floppy, because they’ll keep crisping for a minute after they leave the oven.
Fill the tacos at the last minute
Spoon in the chicken, then top with lettuce, tomatoes, cheese, cilantro, sour cream, salsa, and a squeeze of lime. Assemble them close to serving so the shell keeps its crunch. If you load them too early, the steam from the chicken and toppings will soften the tortilla faster than you think.
Three Easy Ways to Change the Tacos Without Losing the Crunch
Make them dairy-free
Skip the shredded cheese and sour cream, then add extra salsa, avocado, or a dairy-free crema. The tacos still taste complete because the chicken is already well seasoned; you’re just swapping the creamy finish for something lighter.
Use chicken thighs for a richer filling
Boneless chicken thighs stay a little juicier and bring more flavor, especially if you like a softer, richer taco filling. They may take a touch longer to cook, so go by temperature instead of the clock.
Make it gluten-free without changing a thing
These tacos are naturally gluten-free as long as your taco seasoning is certified gluten-free. Corn tortillas keep the shell crisp and give you the same baked texture without needing any flour swap.
Turn the filling into a taco bowl
If you don’t want to bake shells, serve the chicken over lettuce, tomatoes, cheese, and salsa in a bowl. You lose the crunch, but you keep all the flavor and cut the hands-on work down even further.
Storage and Reheating
- Refrigerator: Store the chicken separately for up to 4 days. The shells lose their crunch in the fridge, so keep toppings and tortillas apart if you want the best texture.
- Freezer: The cooked chicken freezes well for up to 2 months. Freeze it in a sealed container or bag, then thaw overnight in the refrigerator before reheating. Don’t freeze the assembled tacos.
- Reheating: Warm the chicken in a skillet over medium-low heat or in the microwave with a splash of water to keep it from drying out. Re-crisp the shells in the oven for a few minutes if needed, then assemble right before serving.
Questions I Get Asked About This Recipe
Baked Chicken Tacos
Ingredients
Equipment
Method
- Season the chicken breasts with salt, pepper, and taco seasoning until evenly coated. Let sit while you heat the skillet for a more flavorful bite.
- Heat the olive oil in a cast iron skillet over medium-high heat. Add the chicken and cook until the internal temperature reaches 165°F, about 6-8 minutes per side.
- Remove the chicken from the skillet and shred it with a fork. Keep the shredded chicken warm for filling the tacos.
- Preheat the oven to 375°F. Lightly spray a sheet pan with vegetable oil cooking spray.
- Form the corn tortillas into taco shells on the sheet pan. Bake at 375°F for 8-10 minutes until crisp and lightly browned.
- Fill each crispy tortilla shell with shredded chicken. Spoon in a generous amount so each taco stays packed.
- Top the chicken with lettuce and tomatoes for a fresh crunch. Add shredded cheese so it clings to the hot filling.
- Finish with cilantro, salsa, and sour cream. Serve with lime wedges on the side for squeezing right before eating.