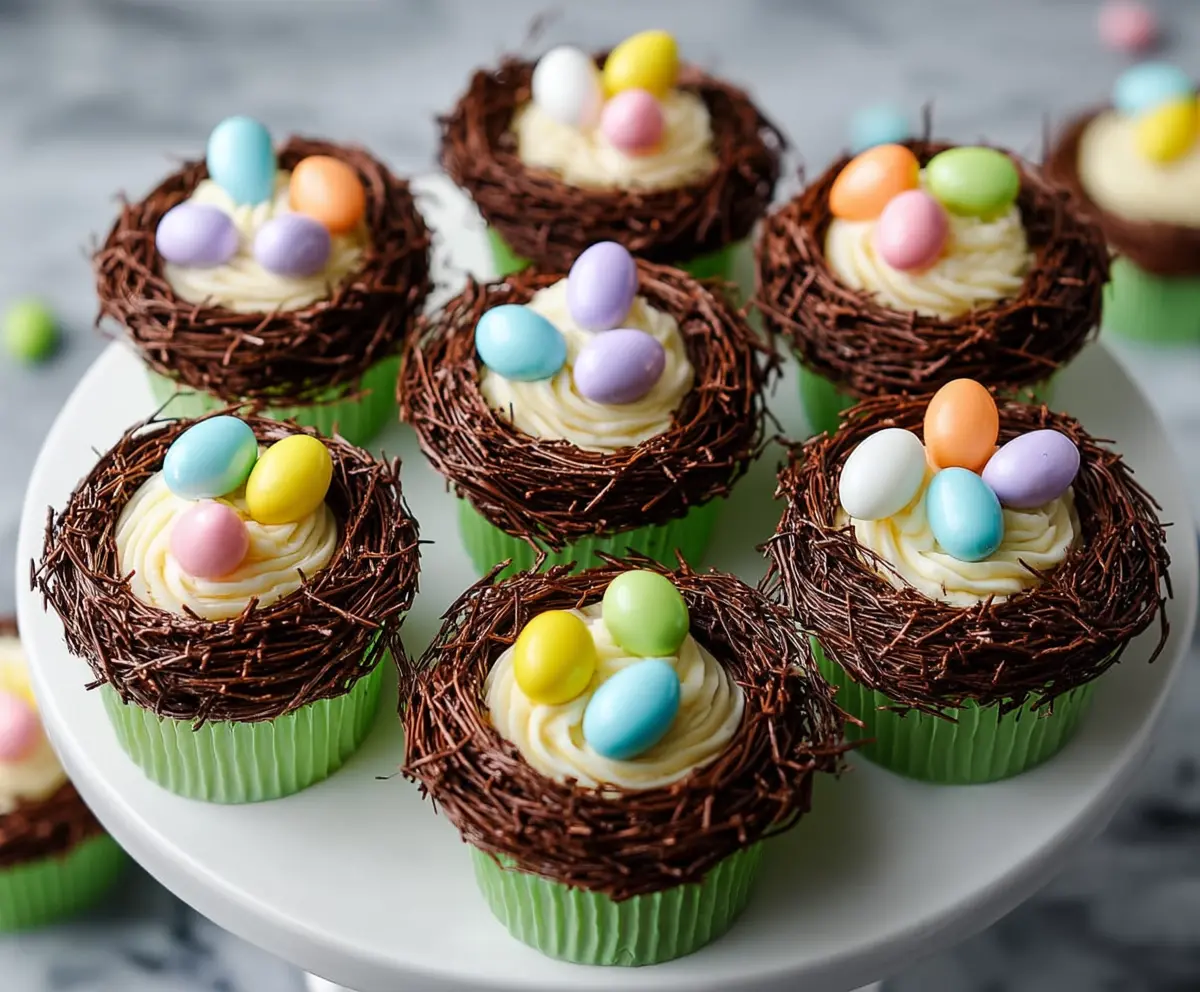
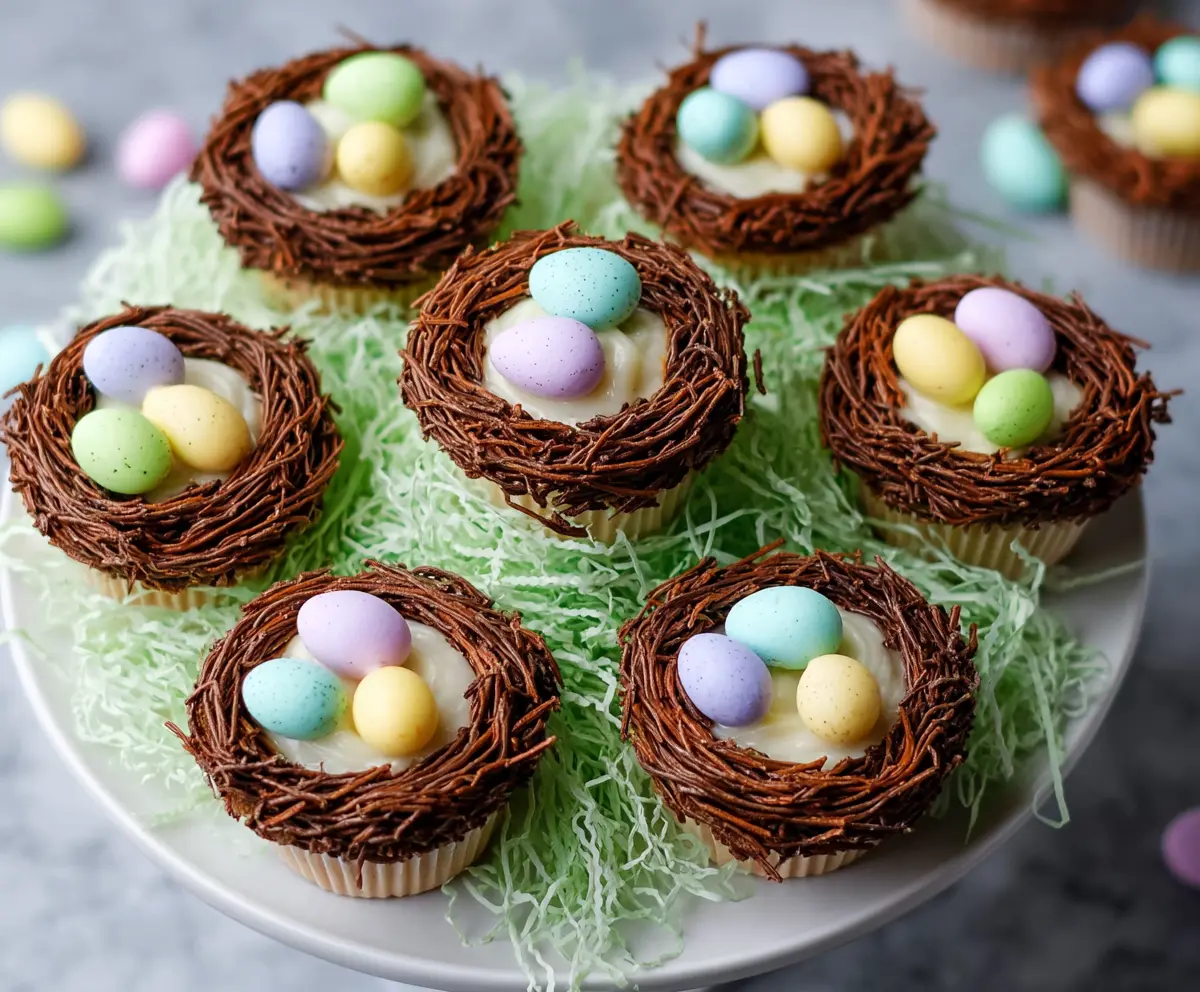
These festive Easter Egg Nest Cupcakes are a fun treat! With fluffy chocolate cupcakes topped with creamy frosting and colorful candy eggs, they look awesome on any table.
Making these cupcakes is a breeze! I love how I can use any candy eggs I want and make them look special for the holiday. Plus, who can resist that cute nest idea? 🐣🌷
Key Ingredients & Substitutions
All-Purpose Flour: This is essential for the cupcake structure. If you’re looking for a gluten-free option, use a 1:1 gluten-free flour blend. Just make sure it has xanthan gum for good texture.
Unsalted Butter: I recommend unsalted butter for balanced flavor. If you’re dairy-free, try coconut oil or vegan butter. You’ll still get fantastic results!
Candy-Coated Eggs: For decoration, any pastel chocolate eggs work well. If you prefer something healthier, swap in dried fruit or nuts shaped like eggs instead.
Semi-sweet Chocolate: This gives the nests their rich flavor. If you want a different flavor, you can try milk chocolate or dark chocolate. Chocoholic tip: melted white chocolate adds a fun twist!
How Do I Achieve Fluffy Cupcakes?
The key to fluffy cupcakes is the creaming method. Start by beating the butter and sugar until they’re airy; the mix should look pale and fluffy. Here are steps to ensure success:
- Use room-temperature butter for easy creaming.
- Beat for about 3-5 minutes until light in color.
- Incorporate eggs one at a time; mix well after each addition.
- Don’t overmix once you add flour and milk; just combine till you can’t see flour.
What’s the Best Way to Melt Chocolate for Nests?
Melted chocolate for nests requires gentle methods to avoid burning. Here’s how you can do it:
- Using a double boiler, heat water in the lower pot, ensuring the bowl with chocolate above doesn’t touch the water. Stir until smooth.
- If using a microwave, heat chocolate in short bursts of 20 seconds. Stir in between until melted.
- Adding coconut oil can make the chocolate shinier and easier to work with.
How to Make Easter Egg Nest Cupcakes
Ingredients You’ll Need:
For The Cupcakes:
- 1 1/2 cups all-purpose flour
- 1 1/2 tsp baking powder
- 1/4 tsp salt
- 1/2 cup unsalted butter, softened
- 1 cup granulated sugar
- 2 large eggs
- 2 tsp vanilla extract
- 1/2 cup whole milk
For The Vanilla Buttercream Frosting:
- 1 cup unsalted butter, softened
- 3-4 cups powdered sugar, sifted
- 2 tsp vanilla extract
- 2-4 tbsp heavy cream or milk
For The Nest Decoration:
- 1 cup semisweet chocolate, finely chopped or chocolate melting wafers
- 1 tbsp coconut oil (optional, helps with melting and shine)
- Chocolate sprinkles or chocolate jimmies (for texture resembling twigs)
For The Easter Eggs:
- Assorted pastel-colored candy-coated chocolate eggs or Jordan almonds
How Much Time Will You Need?
This delightful recipe takes about 40 minutes of prep with an additional 20-25 minutes for baking. Plus, you’ll want to let the cupcakes cool completely before frosting them. It’s a fun and festive way to celebrate Easter!
Step-by-Step Instructions:
1. Prepare the Cupcakes:
First, preheat your oven to 350°F (175°C) and line a cupcake pan with cheerful green paper liners. In a medium bowl, whisk together the flour, baking powder, and salt until well mixed. In a larger bowl, beat the softened butter and granulated sugar using an electric mixer until light and fluffy—this should take about 3-5 minutes. Then, add the eggs one at a time, mixing well after each addition. Don’t forget to mix in the vanilla extract! Now, gradually add the flour mixture and milk to the butter mixture, starting and ending with the flour, until just combined. Divide the batter evenly into the cupcake liners, filling each about two-thirds full. Bake for 18-22 minutes or until a toothpick inserted in the center comes out clean. Once baked, let your cupcakes cool on a wire rack until completely cool.
2. Make the Vanilla Buttercream Frosting:
In a large bowl, beat the softened butter until creamy and smooth. Gradually add the sifted powdered sugar, one cup at a time, beating well after each addition to ensure a lovely, fluffy frosting. Then, mix in the vanilla extract along with 2 tablespoons of heavy cream (or milk). Keep beating until you reach a smooth and fluffy consistency. If your frosting is too thick, add more cream or milk little by little until you get the perfect spreading consistency.
3. Pipe Frosting and Form Nests:
Now, it’s time to make those cupcakes look amazing! Fill a piping bag fitted with a star tip with the vanilla buttercream. Pipe a nice swirl of frosting onto each cooled cupcake, making sure to leave some space around the edges so you can create the nests.
4. Make Chocolate Nests:
Next, let’s prepare the adorable nests! Melt the chopped semisweet chocolate and coconut oil (if you’re using it) in a heatproof bowl over a pot of simmering water, or you can pop it in the microwave in short bursts, stirring in between until smooth. Allow the melted chocolate to cool slightly but remain liquid. In a shallow bowl, place your chocolate sprinkles or jimmies. Using a small spoon or fork, dip the frosted edges of the cupcakes into the melted chocolate, then immediately press into the chocolate sprinkles to give it that twig-like nest texture. Alternatively, you can pipe the melted chocolate onto parchment paper in the shape of nests and let it set separately. Once set, place them onto the frosting.
5. Decorate with Easter Eggs:
Finally, top off your cupcake nests by placing 3-4 pastel-colored candy-coated eggs right in the center of each nest on top of the delicious frosting. They will look so cute and festive!
6. Serve and Enjoy:
Make sure the chocolate on the nests has set before you serve these delightful treats. Present them beautifully on a cupcake stand or platter, and enjoy the smiles from friends and family this Easter!
These cute and festive Easter Egg Nest Cupcakes are perfect for your spring holiday celebrations, bringing joy and deliciousness all around!
Can I Use Gluten-Free Flour for the Cupcakes?
Yes, you can! Just substitute the all-purpose flour with a 1:1 gluten-free flour blend. Make sure it contains xanthan gum for the best texture.
How Do I Store Leftover Cupcakes?
Store any leftovers in an airtight container at room temperature for up to 3 days. If you want to keep them longer, you can refrigerate them for about a week!
What Can I Use Instead of Butter in the Frosting?
If you’re looking for a dairy-free option, use vegan butter or coconut cream instead. Just remember that the flavor will be slightly different, but it will still be creamy and delicious!
Can I Make the Cupcakes Ahead of Time?
Absolutely! You can bake the cupcakes a day or two in advance. Just store them in an airtight container at room temperature until you’re ready to frost and decorate them.