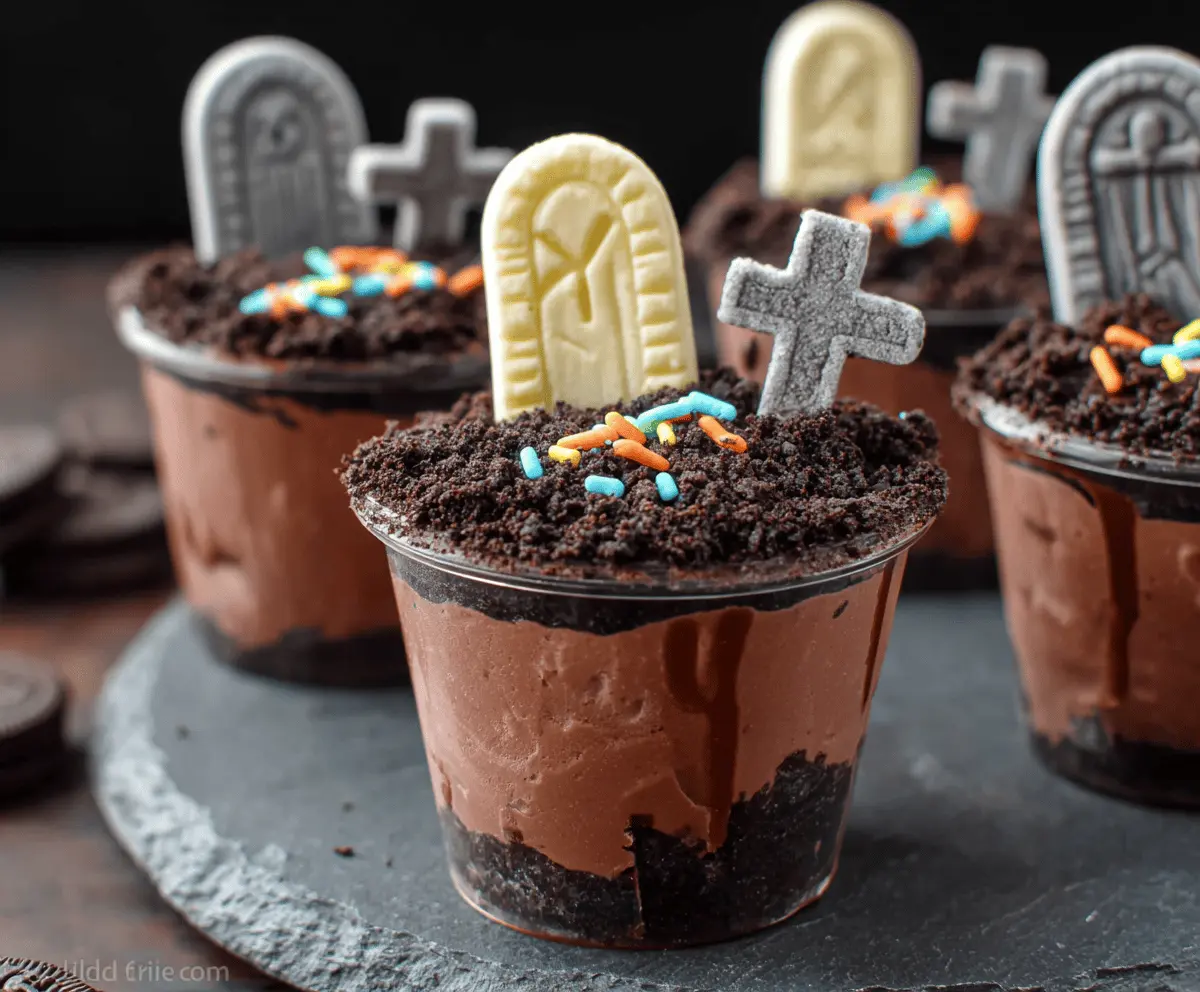
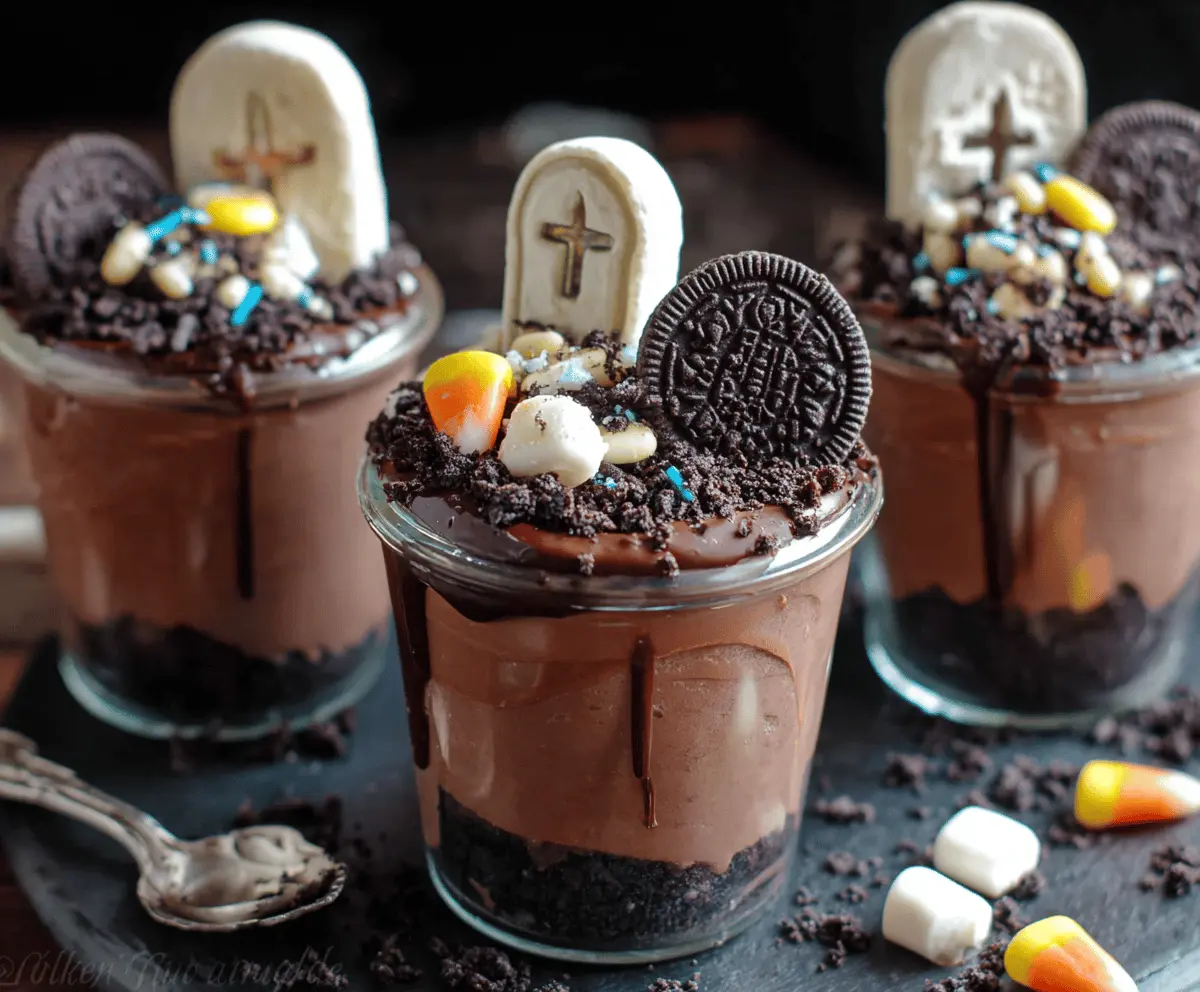
These spooky Graveyard Chocolate Pudding Cups are a fun treat for kids and adults alike! Layered chocolate pudding, crushed cookies, and gummy worms make them look delightfully creepy.
Making these is a blast! I love how easy it is to let the kids get creative with their toppings. Plus, they make any party a bit more festive. Just be ready for some sugar-covered smiles! 😄
Key Ingredients & Substitutions
Instant chocolate pudding mix: This is the star of the dessert, bringing that rich chocolate flavor. If you want a healthier option, you can look for sugar-free versions or even make homemade chocolate pudding!
Heavy cream: For whipped cream purposes, heavy cream gives a rich texture. If you’re looking for a lighter option, you can substitute with whipped topping from a tub or use coconut cream for a dairy-free option.
Oreo cookies: These create the “dirt” layer, adding a crunchy texture. You can swap them for any chocolate cookies you have, like Chips Ahoy or even gluten-free cookies if needed!
Tombstone cookies: These fun cookies really set the Halloween scene. If you can’t find them, any cookie that stands upright will work, like cookie wafers or homemade cookies shaped with a knife.
How Do You Make Whipped Cream That Stays Fluffy?
Making whipped cream is a simple process, but keeping it fluffy is key. First, make sure your cream is cold. Use a cold bowl and beaters if you can, as it helps the cream whip better.
- Start mixing on low to avoid splattering, then speed up gradually.
- Watch the mixture closely; stop once stiff peaks form. Don’t overbeat, or it can turn grainy.
For added stability, you can include a little cornstarch or instant pudding mix during whipping!
What’s the Best Way to Layer Your Pudding Cups?
Layering is important for the visual effect of your Graveyard Pudding Cups. Start with a layer of crushed Oreos for “dirt.” Don’t pack it too tightly, or it may become hard to scoop.
- Next, add a nice dollop of your chocolate pudding mixture, spreading it gently to avoid mixing with the cookie layer.
- Top with reserved crushed cookies to make it look like soil.
- Finally, add your tombstone cookie and decorations carefully to keep them standing.
This layering technique gives an exciting look and ensures every bite has a bit of everything!
Graveyard Chocolate Pudding Cups
Ingredients You’ll Need:
- 2 cups cold milk
- 1 (3.9 oz) package instant chocolate pudding mix
- 1 cup heavy cream
- 2 tablespoons powdered sugar
- 1 teaspoon vanilla extract
- 20 Oreo cookies (or similar chocolate sandwich cookies)
- 10 Halloween tombstone cookies or Milano cookies (or any cookie shaped like tombstones)
- 1/2 cup mini marshmallows
- 1/4 cup candy corn
- Halloween-themed sprinkles or candy decorations
- Optional: chocolate syrup for drizzle
How Much Time Will You Need?
You’ll need about 15-20 minutes for preparation. After that, let them chill in the fridge for at least 30 minutes before serving. That means you can whip them up quickly, and they’ll be perfectly set by the time your guests arrive!
Step-by-Step Instructions:
1. Prepare the Pudding:
In a medium bowl, whisk together the cold milk and instant chocolate pudding mix until it thickens up. This will take just a couple of minutes! Then pop it in the fridge for at least 5 minutes to set nicely.
2. Make the Whipped Cream:
In a separate bowl, use an electric mixer to beat the heavy cream with powdered sugar and vanilla extract. Keep mixing until you see stiff peaks form—this means it’s ready and should be nice and fluffy.
3. Combine Pudding and Whipped Cream:
Gently fold the whipped cream into the chilled chocolate pudding until it’s all combined and creamy. Take your time with this step; you want to keep that light texture!
4. Prepare the Cookie “Dirt”:
Grab those Oreo cookies and place them in a food processor. Pulse them until they’re finely crushed, like dirt! Save about 2 tablespoons of these crumbs for later decoration.
5. Assemble the Pudding Cups:
Take your cups or glasses and spoon a layer of the crushed Oreos into the bottom. This will be your “ground.” Don’t pack it too tightly—just enough to create a nice base.
6. Add the Chocolate Pudding:
On top of the cookie layer, add a generous layer of your chocolate pudding mixture, filling each cup nearly to the top.
7. Sprinkle “Dirt” on Top:
Use the reserved crushed Oreo cookies to sprinkle on top of the pudding to add that fun dirt look!
8. Decorate the Graveyard:
Now for the fun part! Insert a tombstone cookie upright in each cup. Then, have fun scattering mini marshmallows, candy corn, and sprinkles around to give it that festive graveyard vibe.
9. Optional Drizzle:
If you want to make it even more fun, drizzle some chocolate syrup around the edges of the cups for that extra gooey effect!
10. Chill and Serve:
Cover the cups and refrigerate them for at least 30 minutes, allowing all those flavors to blend together. When you’re ready to serve, grab some spoons and enjoy your spooky creation!
This dessert is perfect for Halloween parties, kids’ celebrations, or anytime you want a fun and creepy sweet treat! Enjoy every delicious bite!
Can I Use Non-Dairy Milk for This Recipe?
Yes, you can use non-dairy milk such as almond milk, coconut milk, or soy milk in place of regular milk. Just make sure to choose an unsweetened variety to keep the flavor consistent!
How Long Can I Store the Pudding Cups?
These pudding cups should be stored in the refrigerator and are best enjoyed within 2-3 days. Keep them covered to maintain freshness. Each layer will stay delicious, but the crushed cookie layer may soften over time.
Can I Make This Dessert Gluten-Free?
Absolutely! Use gluten-free chocolate sandwich cookies instead of regular Oreos. There are many great options available that still give you that yummy, crunchy texture!
What Alternatives Can I Use for Decorations?
If you don’t have tombstone cookies, you can use regular chocolate wafer cookies or make simple homemade cookies shaped like tombstones. Other decorations can include gummy worms, chocolate rocks, or even edible glitter for a spooky touch!