Tri-tip earns its place in the dinner rotation when you want a beef roast with a deep, seasoned crust and a pink, juicy center without a lot of fuss. The cut cooks fast for a roast, slices beautifully against the grain, and takes on a Santa Maria-style rub in a way that makes every bite taste like it spent hours on the grill, even when it didn’t.
The key is keeping the seasoning bold and the cooking controlled. Tri-tip has an uneven shape, so the ends will cook faster than the center, and that’s exactly why a short rest matters before slicing. A quick oil coating helps the rub cling and gives the surface enough contact to form a crust, while a final rest keeps the juices where they belong instead of spilling onto the cutting board.
Below I’ve included the grilling method, the oven-roasted method, and the small details that make the difference between a decent beef roast and one you’ll want to make again next weekend.
The rub made a gorgeous crust and the inside stayed perfectly pink after a 15-minute rest. I sliced it wrong the first time and it was still great, but against the grain made it unbelievable.
Save this grilled or oven-roasted tri-tip for the nights when you want a crisp spice crust and a perfectly pink center.
The Part Most People Miss When Cooking Tri-Tip
Tri-tip gets tough when people treat it like a round roast and cook it too far. It’s a lean cut with a thick end and a thinner end, so the goal isn’t to chase a single perfect internal temperature in every inch of the roast. The goal is to pull it at medium-rare, then let carryover heat finish the job while the juices settle.
The second mistake is slicing it the wrong direction. The grain changes across the roast, which means one clean slice direction won’t work for every inch unless you rotate the meat as you cut. Once you find the grain, cut across it. That’s what turns a chewy roast into tender slices.
- Olive oil — This helps the rub stick and promotes browning. You don’t need a fancy finishing oil here; a standard one does the job.
- Kosher salt — The salt seasons the meat all the way through and helps the exterior dry enough to crust. Table salt works in a pinch, but use less because it’s denser.
- Paprika and garlic powder — These build the Santa Maria-style crust without burning as quickly as fresh garlic would. The garlic powder gives depth, and the paprika adds color and a subtle sweetness.
- Dried oregano — It’s a small amount, but it keeps the rub from tasting flat. Fresh oregano would be too wet here and won’t cling the same way.
What Each Ingredient Is Actually Doing in the Rub

- Tri-tip roast — A 3-pound roast gives you enough time to build a crust without overcooking the center. If yours is smaller, start checking temperature earlier because this cut moves fast once the outside is hot.
- Kosher salt, black pepper, garlic powder, paprika, onion powder, and oregano — This is the whole point of the dish. The blend is bold enough to stand up to grilling, but not so heavy that it masks the beef.
- Olive oil — It acts like glue for the spice rub and helps the surface brown evenly. If you skip it, the seasoning falls off and the crust gets patchy.
How to Build the Crust Without Overcooking the Center
Mixing the Rub
Combine the salt, pepper, garlic powder, paprika, onion powder, and oregano in a small bowl until the color looks even. A fully mixed rub seasons more consistently, especially on a cut with uneven thickness like tri-tip. If the spices are clumpy, break them up now so you’re not trying to fix it on the meat.
Seasoning the Roast
Rub the tri-tip all over with olive oil, then press the seasoning onto every surface. Don’t just dust it; press it in so it stays put when the meat hits the heat. Letting it sit at room temperature for about 30 minutes takes the chill off and helps the roast cook more evenly from edge to center.
Grilling for a Deep Crust
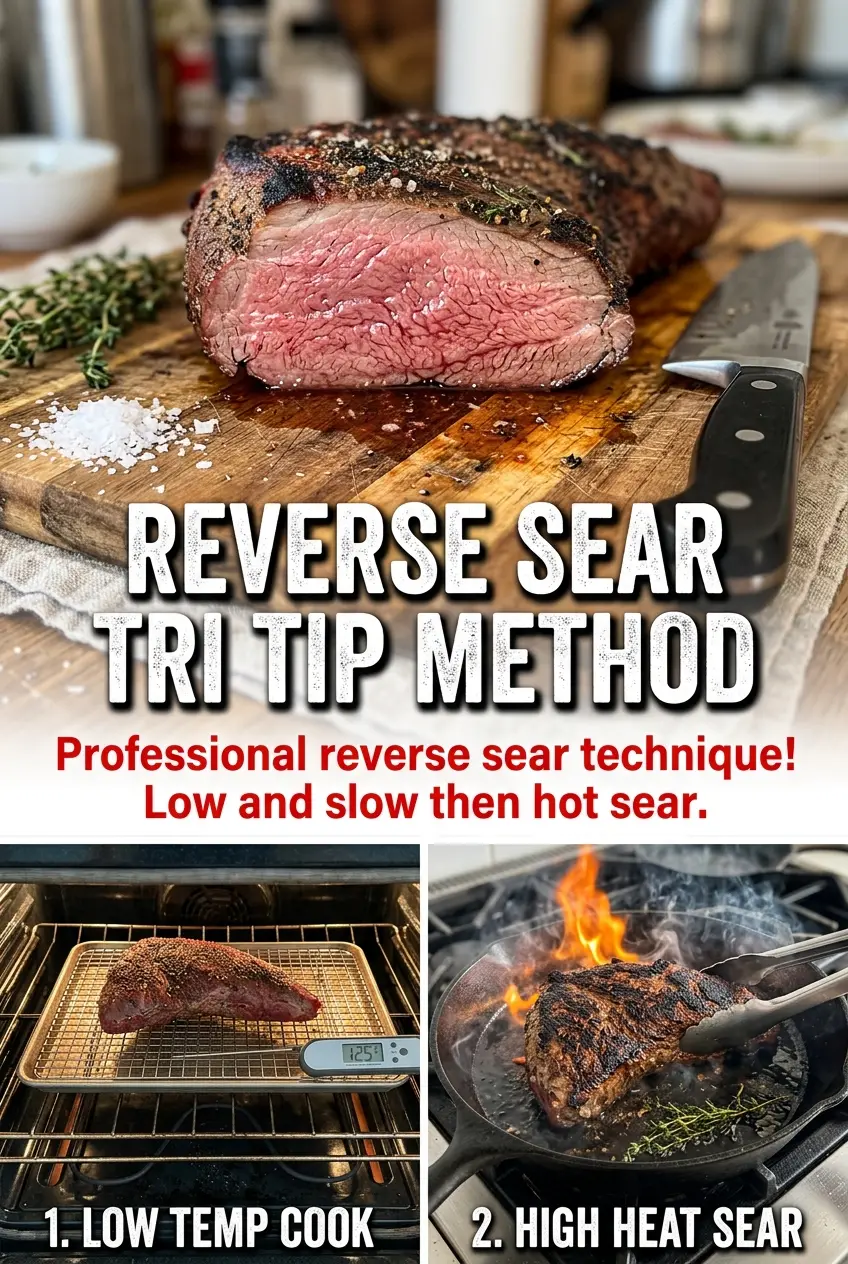
Start over high heat and sear each side for about 5 minutes to get that dark crust. Then move the roast to indirect heat and keep cooking until the thickest part reaches 130-135°F for medium-rare. If the outside is browning too fast, the heat is too high; tri-tip needs a hot start, then a gentler finish.
Oven-Roasting for a Reliable Finish
Sear the roast in a hot skillet first, then transfer it to a 425°F oven and roast for 20-25 minutes, checking temperature early if your roast is on the smaller side. The skillet gives you the crust, and the oven evens out the cooking without drying the meat. Pull it when the center is 130-135°F, because the temperature will rise while it rests.
Resting and Slicing
Let the tri-tip rest for 15 minutes before cutting into it. That pause matters; if you slice too soon, the juices run out and the meat tastes drier than it should. Slice against the grain, and if the grain changes direction, rotate the roast as you go so every piece stays tender.
How to Adapt This Tri-Tip for Different Cooktops and Eaters
Grilled Santa Maria-Style Tri-Tip
Use the grill method when you want the most smoke and char. The indirect heat finish is what keeps the outside from turning hard before the center reaches medium-rare, so don’t park it over direct flame the whole time.
Oven-Roasted Tri-Tip for Bad Weather Nights
The oven version is great when the grill isn’t an option. The skillet sear gives you the browned crust you’d miss outside, and the 425°F oven finishes the roast evenly without a lot of babysitting.
Lower-Sodium Version
Cut the kosher salt back to 1 tablespoon if you need a lighter hand with salt. The roast will still taste seasoned because the pepper, paprika, garlic, and oregano carry a lot of the flavor, but the crust won’t be quite as assertive.
Storage and Reheating
- Refrigerator: Store sliced tri-tip in an airtight container for up to 4 days. It stays best when the slices are packed with any juices from the cutting board.
- Freezer: It freezes well for up to 2 months if wrapped tightly and sealed. Slice before freezing for easier reheating later.
- Reheating: Warm gently in a covered skillet with a splash of beef broth or reheat low and slow in the oven. High heat dries out the leaner edges fast, so avoid blasting it in the microwave unless you want the texture to go leathery.
Questions I Get Asked About This Recipe
Tri Tip - Grilled or Oven-Roasted
Ingredients
Equipment
Method
- Mix kosher salt, black pepper, garlic powder, paprika, onion powder, and dried oregano into a single rub with an even color and no dry clumps (visual cue: uniform speckled mixture).
- Pat the tri-tip roast dry, then rub it all over with olive oil so the surface looks glossy and tacky (visual cue: oil sheen across the roast).
- Coat the tri-tip generously with the spice rub, pressing lightly so it adheres in an even layer (visual cue: thick, reddish-brown crust covering the meat).
- Let the seasoned tri-tip sit at room temperature for 30 minutes so it warms slightly and begins seasoning the surface (visual cue: rub looks slightly absorbed and the meat looks less wet).
- Sear the tri-tip over high heat for 5 minutes per side so a dark crust forms quickly (visual cue: browned exterior and crisp-looking edges).
- Move to indirect heat and cook until the center reads 130-135°F for medium-rare (visual cue: thermometer inserted in the thickest part shows 130-135°F and juices look clear).
- Sear the tri-tip in a hot skillet to build color on the exterior (visual cue: vigorous browning and a deep crust on all sides).
- Roast at 425°F for 20-25 minutes, checking until the center reaches 130-135°F for medium-rare (visual cue: thermometer reads 130-135°F and the crust stays intact).
- Rest the tri-tip for 15 minutes before slicing so juices redistribute (visual cue: meat surface looks set, not actively pooling).
- Slice against the grain right before serving for tender slices, showing the pink medium-rare interior (visual cue: visible pink center with crusty outer edges).