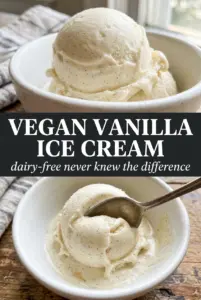
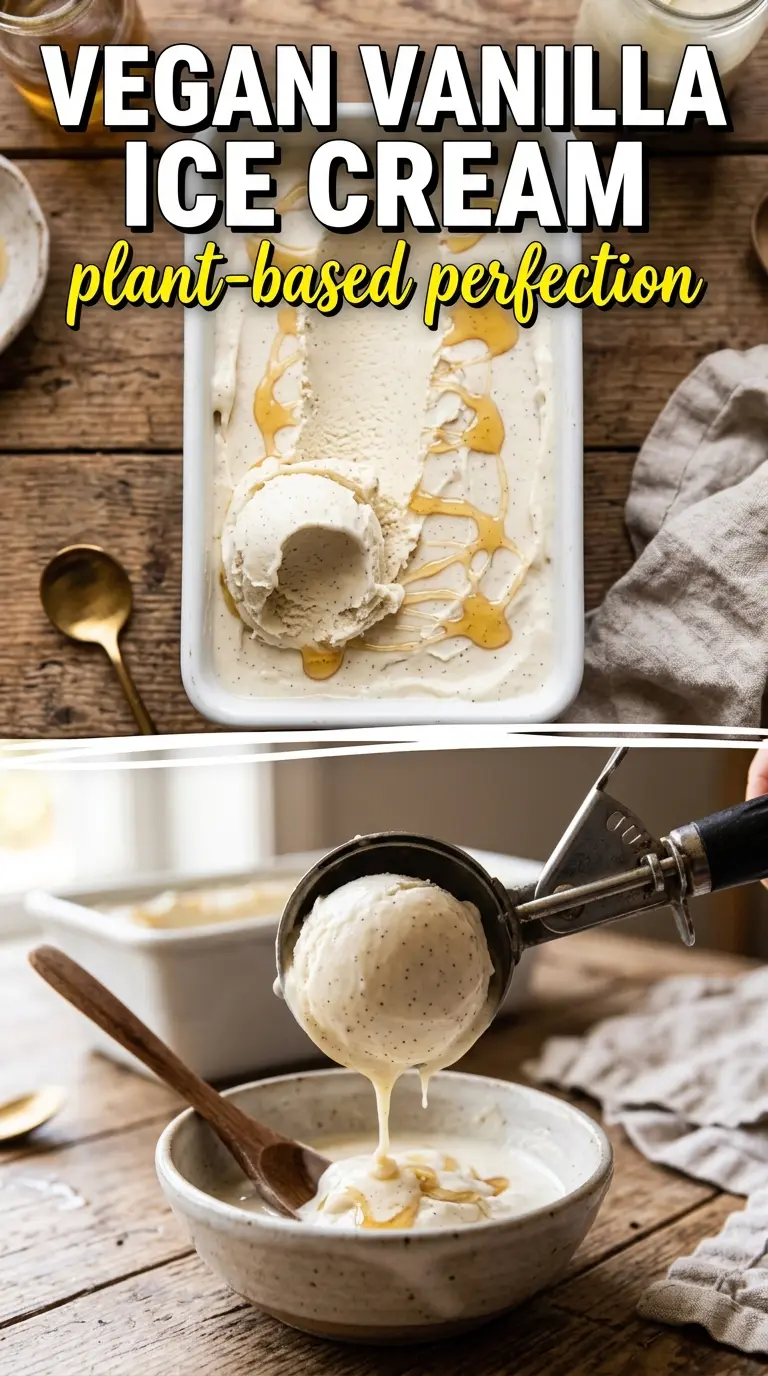
Silky vegan vanilla ice cream with a clean ivory color and a custard-like finish is one of those desserts that disappears faster than you expect. The coconut milk gives it body and creaminess without tasting heavy, and the vanilla stays front and center instead of getting buried under a chalky dairy-free aftertaste. What you get here is a scoop that holds its shape, melts smoothly, and tastes like an actual bowl of ice cream, not a compromise.
The trick is starting with full-fat coconut milk that has been chilled long enough for the cream to separate. That thick top layer is what gives the base enough richness to churn properly. A small amount of starch helps the mixture thicken on the stove, which keeps the finished ice cream from turning icy, and a little coconut oil adds the soft, scoopable texture people often miss in homemade vegan versions.
Below, I’ll walk you through the part that matters most: how to cook the base just enough to thicken it without scrambling the texture, plus a few swaps that still keep the ice cream creamy.
The base thickened right on cue and churned into the creamiest vegan ice cream I’ve made. Even after a night in the freezer, it scooped cleanly instead of turning into a brick.
Save this vegan vanilla ice cream for the days when you want a creamy coconut-milk dessert that still tastes pure and classic.
The Secret to Keeping Coconut Milk Ice Cream Creamy, Not Icy
The biggest mistake with vegan ice cream is treating the base like a thin custard. Coconut milk needs a little help to stay smooth after freezing, and this recipe gives it exactly that with starch, fat, and enough chilling time before it goes into the machine. If you rush the cooling step, the churned ice cream may taste fine at first but freeze into a firmer, icier block later.
The second thing that matters is using the thick cream from the top of the cans, not the watery liquid underneath. That concentrated fat is what gives you body and that soft, scoopable finish. Whisking constantly while the base heats keeps the starch from clumping and helps the mixture thicken evenly instead of turning grainy at the bottom of the pan.
- Full-fat coconut milk — This is the backbone of the recipe. Light coconut milk won’t give you the same richness or structure, and it usually freezes harder. If the cans haven’t separated much, chill them longer before opening.
- Maple syrup or agave — Both sweeten and help keep the texture supple straight from the freezer. Maple adds a little warmth; agave tastes cleaner and slightly more neutral.
- Arrowroot or cornstarch — This is the small amount of insurance that keeps the base from freezing too hard. Cornstarch works well and is the easiest swap if that’s what you keep on hand.
- Coconut oil — A tablespoon goes a long way here. It softens the final texture without making the ice cream taste oily, but don’t add much more or the base can start to feel waxy.
What Each Ingredient Is Actually Doing in This Frozen Dessert
- Base ingredient (cream, milk, or non-dairy) — This provides the foundation and richness. Quality matters.
- Sweetener (sugar, honey, or other) — This sweetens and prevents ice crystals. The ratio is critical.
- Flavor element (vanilla, fruit, or other) — This defines the ice cream personality. Use quality ingredients.
- Stabilizers (egg yolks, cornstarch, or gelatin) — These prevent melting and large ice crystals. Optional but helpful.
- Churning (if using ice cream maker) — This incorporates air and prevents ice crystals. Critical for smooth texture.
- Freezing temperature and time — Proper freezing prevents rock-hard texture. Store at 0°F or below.
- Mix-ins (chocolate, cookies, or fruit) — These add texture and prevent monotone flavor. Add near end of churning.
- No-churn method (if using whipped cream or condensed milk) — This creates creamy texture without ice cream maker. Freezing time is longer.
Cooking the Base Until It Barely Thickens
Separating the Coconut Cream
Open the chilled cans and scoop out the solid cream from the top, leaving the liquid behind for another use. The cream should look dense and spoonable, almost like softened shortening. If the can is still mostly liquid, it wasn’t cold enough, and that lack of fat will show up later as a thin, icy texture.
Warming and Thickening the Mixture
Combine the coconut cream, sweetener, vanilla, starch, salt, and coconut oil in a saucepan. Warm it over medium heat while whisking constantly, and watch for a slight thickening rather than a full simmer. You’re looking for the mixture to coat the back of a spoon lightly; if it boils hard, the starch can turn gummy and the vanilla will lose some of its brightness.
Cooling Before Churning
Let the base cool completely, then refrigerate it for at least 4 hours. This step matters because an ice cream maker needs a cold base to churn in tiny ice crystals, not big ones. If you churn while the mixture is still warm, the machine struggles and the final texture gets slushy before it freezes up firm.
Churning to the Right Soft-Serve Stage
Pour the chilled base into your ice cream maker and churn until it looks like thick soft serve and clings to the dasher. At this point it should be airy but still loose enough to scoop or spread. If you overchurn it, the fat can start to tighten too much and the texture turns dense instead of creamy.
Three Ways to Make This Vegan Ice Cream Work for You
Vanilla Bean Version
Replace part or all of the vanilla extract with the seeds from a vanilla bean pod. The flecks look beautiful, and the flavor reads deeper and more floral. This works especially well when you want the ice cream to taste a little more special without changing the texture at all.
Lower-Sugar Swaps
Use agave instead of maple syrup if you want a more neutral sweetness. The result is slightly softer and less aromatic, which can be helpful if you plan to serve the ice cream with a strongly flavored dessert. Cutting the sweetener much further will make the base freeze harder.
Dairy-Free and Gluten-Free by Design
As written, this recipe is already dairy-free and gluten-free, which makes it easy to serve to a mixed crowd. Just check that your vanilla extract and starch are certified if you need to avoid cross-contamination. Cornstarch is the simplest gluten-free choice here.
Storage and Reheating
- Refrigerator: The churned base isn’t meant for fridge storage once frozen, but the cooked mixture can be chilled up to 2 days before churning. Keep it covered so it doesn’t pick up fridge odors.
- Freezer: It freezes well for about 2 weeks. After that, the texture starts to dry out a bit at the edges, even in a covered container.
- Reheating: Let it sit at room temperature for 10 to 15 minutes before scooping. Microwaving makes the edges melt before the center softens, which throws off the texture.
Questions I Get Asked About This Recipe

Vegan Vanilla Ice Cream
Ingredients
Equipment
Method
- Scoop the solid coconut cream from the top of refrigerated coconut milk cans, reserving the coconut water for another use.
- Add the coconut cream, maple syrup, vanilla extract, arrowroot (or cornstarch), salt, and coconut oil to a saucepan.
- Heat the mixture over medium heat, whisking constantly, until it thickens slightly, about 5 minutes (visual cue: it should look like a loose custard coating the whisk).
- Cool the mixture completely, then refrigerate at least 4 hours (visual cue: it should be cold and noticeably thicker).
- Churn the chilled mixture in an ice cream maker until it reaches a soft, scoopable consistency.
- Transfer to a freezer-safe container and freeze until scoopable (visual cue: firm edges with a scoopable center).